Raspberry Pi Zero USB dongle (use SSH over USB cable like over Ethernet)
About post
Imagine, if you will be able to use SSH (or even VNC) connection to your Raspberry Pi Zero using only USB cable without any hardware modifications. Amazing, isn't it?
You can find other instructions on Youtube requires hardware modification, but you can do this without soldering and so on.
All you need to follow these instructions.
Installing OS and tuning OTG mode
I'm using Windows 7 x64 now so here will be some special instructions for Windows users which can be skipped by users from other OS's.
First of all you need write OS to your SD card. You can find many instructions in Internet, so I will not describe. All that I can tell you - I prefer to use Win32DiskImager.
If you want use GUI you can download Raspbian Jessie with PIXEL, otherwise you can use Raspbian Jessie Lite without GUI subsystem. Raspbian can be found here:
When you using modern version of Raspbian, you must know that by default SSH disabled. So, now you can't just write OS to SD card, run your RPi find it in network using nmap for Windows and connect using SSH/Putty.
Just create empty file named ssh in /boot folder. I also described these steps in my previous post in section "Installing Raspbian and enabling SSH".
Warn! This is very important to enable SSH.
After that you need tune your RPi Zero to use OTG in specific way - interacting as Ethernet/RNDIS Gadget.
After that you need open /boot partition (in which you already created ssh file) and here modify two files.
Open file config.txt and add this line to the end of file:

config.txt
After this you need open cmdline.txt and add these words:
after word rootwait

cmdline.txt
Warning! This must be in single line.
Connecting to PC
Physical connection
Next you just need connect your RPi Zero to your PC/laptop. For this you need connect USB data cable to USB connector, not into PWR!

connecting to laptop
Be patient, because RPi Zero boot sequence can take up to 90 seconds.
Installing RNDIS driver
If Windows have needful driver you will see this in your devices list:

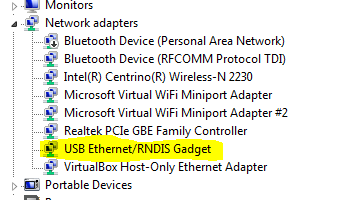
Ethernet/RNDIS in devices list
When Windows do not have correct driver you can see RNDIS/Ethernet Gadget in Other devices section. In this case you need:
- select Update driver software from context menu;
- choose Browse my computer for driver software;
- next click Let me pick from a list of device drivers on my computer;
- next select Network adapters device type;
- choose Microsoft manufacturer;
- select Remote NDIS compatible device;
- And click Next.
After this you need try to ping raspberrypi.local host. If this host avail you can skip next step.
Installing Bonjour
To be able to use .local hosts under Windows you need install Bonjour service from Apple Inc. You can download it here:
https://support.apple.com/downloads/bonjour_for_windows
Bonjour for Windows
After installing Bonjour and adding Firewall exception you will be able to ping raspberrypi.local host.
Connecting to RPi Zero using SSH/Putty over USB RNDIS
To connect to your RPi Zero USB dongle just run your SSH/Putty and type raspberrypi.local as target host:
connecting using putty
Next you need enter you login and password. By default Raspbian uses login pi and password raspberry.
Warning! Do not forget change your default password!
Connecting to RPi Zero X-System using VNC
First of all you need enable VNC on your RPi Zero. To do this you need execute:
$ sudo raspi-config
Then scroll to Interfacing Options:

find VNC

and enable it:

https://www.realvnc.com/download/viewer/windows/
I prefer this settings which allows me to use portable app:

Next you need unpack and execute VNC viewer. After this execute Real VNC and specify raspberrypi.local:1 as target


If you see something like:

You may start VNC server manually by running:
$ vncserver
After entering this command you will see something like this:

vncserver output
Then retry connect using Real VNC. Using name raspberrypi.local:1 (please note, that we connecting to screen number 1) or real IP 192.168.137.242:1 (Warn! This ip is valid only for this example!)
You can see VCN security warning, so just click Continue to use this connection. You may be asked for login and password. So, specify login pi and your password.
After all you can see PIXEL UI on your RPi Zero.

VNC connection
Anytime you can kill VNC session using:
$ vncserver -kill :2
where :2 is your session number.
Connecting RPi Zero to Internet
You can check your Internet connecting just pinging something in outside world:
$ ping google.com
Next you need find and identify your RNDIS gadget connection. You can find it by by description:

Next you need find connection which you want to be shared with RPi Zero and call Properties from context menu:

Next go to Sharing tab and enable Allow other network users... then select RPi Zero RNDIS network from combobox below:

After this you will be able to use shared Internet connection from your RPi Zero.
Results
Now you have RPi Zero connected to your host system via USB cable. You can power you RPi Zero just ower USB, you also able to connect via USB like via Ethernet and work using SSH/Putty or VNC. RPi Zero can have Internet-connection and download packages.
What can you do with this? Anything you want. You can have portable debug server hosting any server software (apache, nginx, anything else).
Also, you can play more with RPi Zero OTG and tune it to be camera, HID device, keyboard or anything else.
Enjoy!
This was super helpful! Thanks so much for sharing!
ReplyDeleteYour welcome! Glad to be useful!
DeleteThank you so much, really helpful !
ReplyDeleteHi! I use a WiFi dongle and ssh my Zero Pi, but your solution is more interesting.
ReplyDeleteHow can I use USB OTG from the Linux machine? Is it a matter of "couple of words", so that you can give a hint?
Sorry, I know only Win based solution
Delete